Showing posts with label Artfully Layered. Show all posts

Sunday, March 27, 2022

Artfully Layered for PP584

Happy Sunday, friends!
Time for a fun new creative challenge over at The Paper Players! 
This week, the always lovely LeAnne is hosting our Sketch Challenge.
Oh, Sketch Challenge week is always my favorite and LeAnne’s sketch does not disappoint! As soon as I saw the sketch, I knew it would be great to showcase Designer Series Papers. Although I think a simple card without pattern would work well with this sketch too. I’m just on a mission to use more DSP this year, so I had a bit of “tunnel vision”. Haha! There are a lot of possibilities with this sketch and I will definitely be filing it in with my favorites. :)  

*I’ve listed all of the measurements and details for my card below and there is a full supply list at the very end of this post.
Color Combo: 

I just love the bold images in the Artfully Layered stamp set and Tropical Layers Dies! The coordinating Artfully Composed Designer Series Paper coordinates beautifully too. I decided to showcase one of the patterns on the three focal layers of the card and accent with a couple of the die cut leaves. 

I also layered in a piece of the Vellum Layering Designs paper between the Old Olive layer and the DSP. I haven’t used this vellum yet and I have no idea why! It adds such a fun subtle pattern and the vellum compliments the color layered behind it perfectly. The key when adding vellum to a card is to only use adhesive in the areas that do not show through to the front of the card. 
Card Measurements & Details: 
  • Evening Evergreen Card Base: 5-1/2” x 8-1/2”, scored at 4-1/4” ”
  • Old Olive Cardstock: 5-1/4” x 4" 
  • Velum Layering Designs Paper: 5-1/8” x 3-7/8”
  • Artfully Composed Designer Series Paper: Start with a piece that is 4-1/2” x 3-1/2” , then cut into three 1-1/2” x 3-1/2” strips. Layer the strips with about 1/8” between them on the vellum. 
  • Gold & Rose Gold Metallic Specialty Paper: 2-1/2” x 3-1/4”, for die cut leaves
  • Bumblebee Cardstock: 2-1/2” x 3-1/4” for die cut leaves
  • Evening Evergreen Cardstock: 3-3/4” x 3/4”, stamp sentiment in Versamark ink, heat emboss using White Embossing Powder and punch both ends with Banners Pick A Punch
  • Linen Thread and In Color (Evening Evergreen) Jewels
  • Basic White Cardstock (inside card): 5-1/4” x 4”, stamp sentiment in Evening Evergreen ink
  • Artfully Composed Designer Series Paper (inside card): 1/2” x 4” 
Here is a peek inside the card. I simply added another strip of Designer Series Paper and a stamped a coordinating sentiment. You can never have too many birthday cards ready to mail out, right? 
I decided to make a second card using a slightly different color combo using a different pattern of the beautiful Artfully Composed Designer Series Paper. For this card, I used the same measurements as the first but spread out the DSP layers a bit more, leaving about a 1/4” border around the vellum layer and between the DSP pieces. 

Color Combo: 
For this card, I used some of the Evening Evergreen Shimmer Vellum for one of the die cut leaves. For the other leaves, I die cut them in Basic White Cardstock, then heat embossed them in White Embossing Powder for added shine. It’s tough to see in the photo, but it’s a really nice detail, in person. 

I hope you will join us this week over at The Paper Players and share your project for our fab        SketchChallenge. We’d love to see what you come up with! You can link up your project through Noon PST on Friday April 1st, 2022. 

Be sure to stop by and say hello to The Paper Players Design Team: 
 
Anne Marie Hile (that’s me!) 

Thanks for visiting today! All of the products that I used on this card are listed below. You c
an click on any of the photos to go directly to my 
Stampin’ Up!® online store. 

The current Host Code is: ETSD432J

Also, If you place an order over $50 (before tax and shipping) using the above host code, you will also receive a gift from me: a FREE Exclusive Project Tutorial PDF, see the sneak peek below. Each month, I partner with an amazingly talented group of demonstrators from around the world to create these project tutorials. This month's tutorial features 13 awesome project ideas to inspire your creativity! 
If your order is over $150, please do NOT use the host code. 
You will still receive the PDF tutorial along with an additional free gift from me.
The new Stampin’ Up!® Annual Catalog will be here starting May 3rd! 
Be sure to check out the retiring products, some up to 50% off. 


Thanks for stopping by.
Have a HAPPY day!

Big hugs, 
Anne Marie


Product List

Tuesday, March 1, 2022

Positive Inkers Global Design Team - March 2022

Hello there stamping friends! I’m thrilled to be blog hopping today with the Positive Inkers Global Design Team. We are a group of Stampin’ Up!® Demonstrators from around the globe who are super-excited to share our love of creativity. I’m so happy you stopped by today! 

If this is the fist time you are visiting, please let me introduce myself. My name is Anne Marie Hile and I live in San Antonio, Texas. Welcome! 
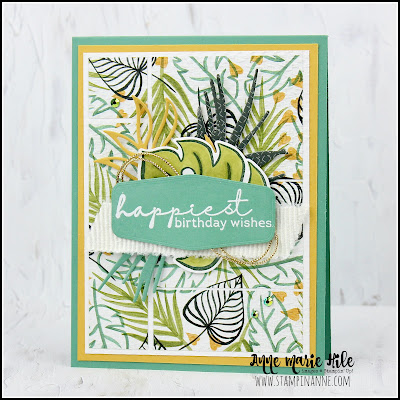
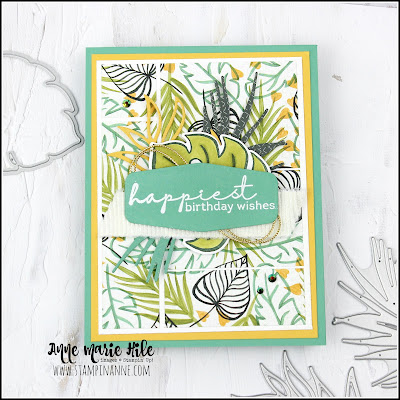
Our theme for this month is projects featuring products from the Stampin’ Up!® January - June Mini Catalog. I recently hosted a Mystery Stamping meeting for my awesome team and one of the bundles I used was the the Artfully Layered stamp set and Tropical Layers Dies. I’m a little smitten with this bundle right now, as it hasn’t left my desk since I did that event with them. Haha! For our blog hop this month, I thought I would take the card I made for my team event and step it up a little. If you have visited me before, you know I LOVE layers but this card layout is so fun, you don’t have to add a bunch of bells and whistles and it still looks great. I’ve shared my original card below, so you can see both options. 

*I’ve listed all of the measurements and details for my cards below and there is a full supply list at the very end of this post.
Color Combo: 
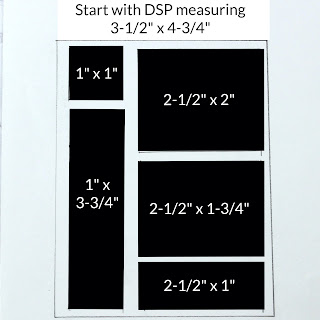
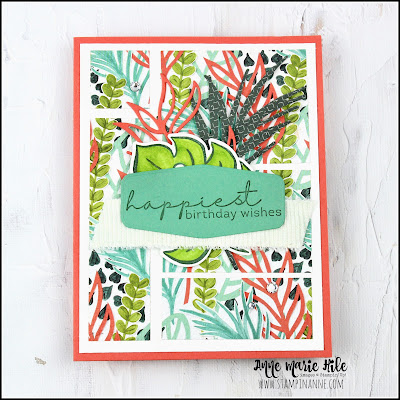
This card layout was inspired by my sweet friend Sharon Armstrong and I just love how the Designer Series Paper creates lot of interest in the background because of how it’s cut and layered onto Basic White Cardstock. The key when you are cutting the DSP is to make sure the patterns line up though. I’ve shared a template in the instructions below that will hopefully help out with that. 

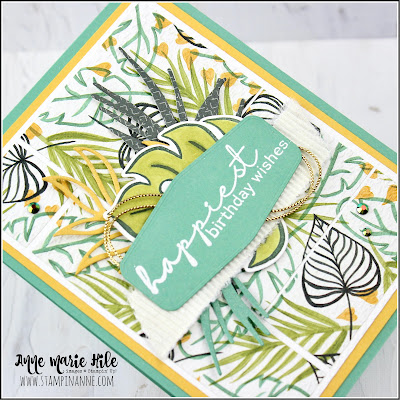
After the DSP is layered to the Basic White Cardstock, I embossed the whole layer with the Tasteful Textile Embossing Folder. It’s tough to see in the photos, but it really adds a lot of detail to the card. When you adhere the DSP, use liquid glue. You’ll thank me later. Haha! It helps to give some “wiggle room” to adhere the layers straight. I didn’t use glue on one of my layers and it’s crooked. Gah! Not that I want you to go looking for it...but now that I’ve let the cat out of the bag, I’m sure it will be blatantly obvious which layer it was. Even my “strategic watermark placement" couldn’t cover it completely. But, it’s a handmade card and those little imperfections just add to the charm, right? *wink, wink*
Card Measurements & Details:
  • Just Jade Card Base: 4-1/4” x 11", scored at 5-1/2" and folded in half
  • Bumblebee Cardstock: 4” x 5 1/4” 
  • Basic White Cardstock: 3-3/4” x 5"  
  • Artfully Composed Designer Series Paper: 3-1/2” x 4-3/4”, start with the left side and cut as shown in the photo below. Start by cutting 1” vertically on the left side, then cut the second piece horizontally. Do the same with the 2-1/2” wide strip. This ensures the patterns line up when you layer them on the Basic White DSP. 

(Please excuse that this is not completely spaced correctly or 100% perfect. I went off a hand-drawn sketch I shared with my team and tried to clean it up to make it easier to read. Hopefully it helps to make cutting the DSP easier for you! Leave me a comment or email me with any questions: annemariehile@gmail.com)
  • After layering the DSP to the Basic White Layer, emboss the entire layer with the Tasteful Textile 3D embossing Folder for added texture
  • Artfully Composed Designer Series Paper: die cut the large leafy fern image from the Evening Evergreen pattern
  • Bumblebee Cardstock: die cut the fern with the open leaves, accent with Wink of Stella
  • Just Jade Cardstcok: die cut another leafy fern image and cut a few pieces to accent the bottom left corner under the sentiment 
  • Basic White Cardstock: scrap to stamp the leaf image in Evening Evergreen ink and color with Old Olive Stampin’ Blends, die cut 
  • Just Jade Cardstock: scrap to stamp the sentiment in Versamark ink, heat emboss with White Embossing Powder and die cut using the Tasteful Labels Dies
  • White Frayed Ribbon, Simply Elegant (gold) Trim and In Colors Jewels
  • Basic White Cardstock (inside card): 4” x 5-1/4”, stamp sentiment in Evening Evergreen ink
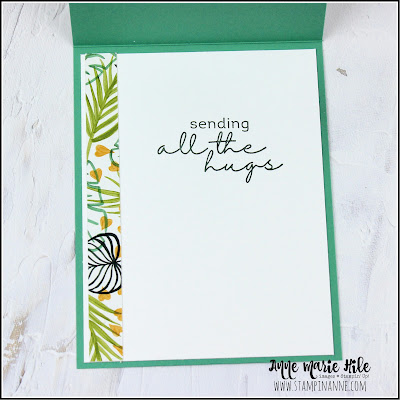
  • Artfully Composed Designer Series Paper (inside card): 1/2” x 5-1/4”  
Here is a look inside the card. I simply added a little strip of the Artfully Composed DSP and a coordinating sentiment to “keep the party going” from the front of the card. I seriously LOVE the font in this stamp set, don’t you? 
Finally, here is the original card from the Mystery Stamping meeting I hosted with my team. I skipped the middle layer and switched up the color combo to Calypso Coral, Evening Evergreen and Granny Apple Green. I stamped the sentiment in Evening Evergreen ink instead of heat embossing. I used Basic Rhinestones for the gems and they really pop on the card. If you wanted to make it even easier, you could also skip cutting the DSP into the smaller pieces and just cut it to 3-3/4” x 5” for the background. This is just another option to create the card that is a little less work, but still looks great to send some birthday cheer! :) 

I hope you enjoyed my card today! Please stop by to visit everyone on the hop and leave us a comment to say hello. We’d all love to hear from you and so appreciate you stopping by. Hope you enjoy all of the beautiful projects everyone shared today! 

Positive Inkers Global Design Team - March 2022
Anne Marie Hile - USA (you are HERE!) 

Thanks for visiting! All of the products that I used on this card are listed below. You c
an click on any of the photos to go directly to my 
Stampin’ Up!® online store. 

The current Host Code is: ETSD432J

Also, If you place an order over $50 (before tax and shipping) using the above host code, you will also receive a gift from me: a FREE Exclusive Project Tutorial PDF, see the sneak peek below. Each month, I partner with an amazingly talented group of demonstrators from around the world to create these project tutorials. This month's tutorial features 13 awesome project ideas to inspire your creativity! 
If your order is over $150, please do NOT use the host code. 
You will still receive the PDF tutorial along with an additional free gift from me.

Thanks for stopping by.
Have a HAPPY day!

Big hugs, 
Anne Marie

Product List
Heat Tool*
Heat Tool*
[100005]