Happy Sunday, friends!
Time for a fun new creative challenge over at The Paper Players!
This week, Claire is hosting our Tic-Tac-Toe Challenge.
Rows Selected:
Plaid - Die-Cut - Embossing
Patterned Paper - Die-Cut - Sequins/Enamel Dots
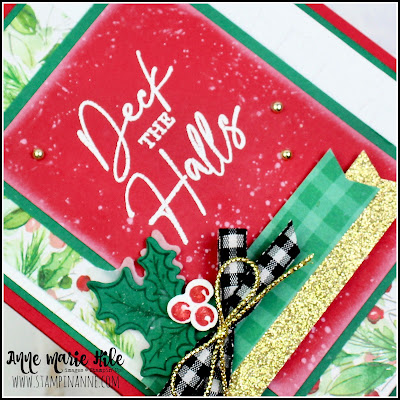
Tic-Tac-Toe week is so much fun! I love all of the options to really get the creative mojo working. There are so many possibilities! I decided to skip some of the fall-themed squares because I’m in a bit of a festive mood this week making Christmas cards. In the end, I ended up using elements from two rows on the board. Hooray! I sure hope you will take this challenge for a spin and join us over at The Paper Players. We’d love to see what YOU create!
*I’ve shared measurements and a full supply list of products used to create this card at the end of this post.
Right now, I am really enjoying creating with the Christmas Classics stamp and die bundle from the Stampin’ Up!® Mini Catalog. I don’t know why I waited so long to order this set…it truly makes awesome…well, classic holiday cards. I really like the detailed frames in this set and decided to make that the focal image of my card.
To bring in a little pop of red on the holly berries I initially die-cut another frame in Real Red, cut off the berries and glued them on the Shaded Spruce frame. But I just felt like it needed a little “more” to make the berries pop. Then I remembered that I ordered the Metallic Enamel Effects a while ago, stuck them in my embellishment drawer and forgot about them. The red added the coolest pearlized effects to the berries, exactly what I was wanting. They take a little bit to dry, but the end result is SO worth it!
Measurements and Details:
- Shaded Spruce Card Base: 5-1/2” x 8-1/2”, scored at 4-1/4”
- Real Red Cardstock: 5-1/4” x 4” and 4-1/4” x 3”
- Joy of Christmas Designer Series Paper: 5-1/8” x 3-7/8” and 5-1/4” x 1/2”
- Basic White Cardstock: 4-1/8” x 2-7/8” (embossed with Merry Melody 3D Embossing Folder), 4” x 1-1/4” and 5-1/4” x 4”
- Shaded Spruce Cardstoock: 4-1/4” x 4”
- Silver Glimmer Paper: scraps for (2) die-cut leaves
- Adhesive-Backed Sparkle Gems and Real Red Ribbon
Finally, a peek inside the card. I simply added a strip of DSP and a coordinating festive sentiment to “keep the party going” from the front of the card. I made a few extra of these for team swaps because they were so fun to create!
I hope you will join us this week over at The Paper Players and share your project for our Tic-Tac-Toe Challenge. We’d love to see what you come up with! You can link up your project through Noon PST on Friday November 3rd, 2023.
Be sure to stop by and say hello to The Paper Players Design Team:
Thanks for visiting today! All of the products that I used on this card are listed below. You c
The current Host Code is:
JV6DKGQY
Place an order over $50 (before tax and shipping) using the above host code, you will also receive a gift from me: a FREE Exclusive Project Tutorial PDF, see the sneak peek below. Each month, I partner with an amazingly talented group of demonstrators from around the world to create these project tutorials. This month's tutorial features 13 awesome project ideas to inspire your
creativity!
If your order is over $150, please do NOT use the host code.
You will still receive the PDF tutorial along with an additional free gift from me
Registration is open through November 20, 2023 for my Cultivated Creativity DIY Paper
Crafting Kit club. This month features the new Winter Owls stamp set and coordinating Winter Owls Dies. Five gorgeous projects you won’t want to miss!
The Maker’s Mojo team is excited to bring you the Warmest Heart Card Class to go. Join our upcoming 5-card class and let your creativity bloom! Unleash your inner artist with the stunning Warmest Heart Stamp & Die Bundle from Stampin' Up!
Registration is open NOW through November 12th!
Get the class details HERE: https://bit.ly/3FuFTUJ
Register HERE: https://bit.ly/3tM0QrW
Thanks for stopping by.
Have a HAPPY day!
BIG Hugs,
Anne Marie

.jpg)

.jpeg)
.jpg)
.jpg)


