Showing posts with label PPA challenge. Show all posts

Sunday, September 11, 2011

Paper Players #63- Color Challenge

Hello there! Before I get to today's post, I want to take a moment to reflect. Today marks the 10th anniversary of the September 11th attacks, here in the U.S. Today we honor those who lost their lives on that tragic day, those who continue to mourn the loss of their loved ones, those that were first on the scene and those serving our country in the military. Today, as a nation, we REMEMBER...and we are strong

This week at the Paper Players, the lovely and talented Nance whipped up a fabby color challenge for us: 
Here is what I created: 
Pals Paper Arts is having a Halloween theme challenge and that was the perfect inspiration for my FIRST Halloween card of the year. Woot Woot, I just LOVE making cards for fall holidays!
I used this week's fantastic sketch over at Stamping 411 for my card layout: 
The stamped image was embossed and colored-in with Stampin' Write Markers. The complete supply list is featured below this post. I don't want to over-explain the card, but if you have questions, I am only an email away: 
annemariehile@gmail.com
Thanks for stopping by! Please make sure to pop over to the rest of the lovely ladies on the Paper Players Design Team and check out their colorful creations. We hope you will join us this week and play along. 
The Paper Players Design Team
Nance Leedy
Tara Bilbao
Sandra Conner (September GD)

Rita Wright (this week's super-star-guest!)

Before I go, I thought I would share another fun photo with you. It's time for some Benny Max! If you have visited before, you know this kitty LOVES the spotlight. He is looking uber-fluffy in this shot...although it is up for debate if it is "chunk" or truly "fluff". Either way, you have to give him some props for the intense stare. He's such a mess! ;)  


Stampin Up! Supply List: 
Stamps: Wicked Cool 
Paper: Frightful Sight DSP, Riuch Razzleberry, Basic Gray, Old Olive and Whisper White card stock
Ink: Basic Black Craft ink
Accessories: Stripes Embossing Folder, Scallop Edge Border punch, Rich Razzleberry and Old Olive Stampin' Wrrite Markers, Rich Razzleberry 5/8" Satin Ribbon (ret.), Clear Embossing powder, Heat Tool, Stampin' Dimensionals and Basic Rhinestones
Non-SU Accessories: circle and scallop circle die cuts , glitter glue

Tuesday, June 21, 2011

Butterfly Thanks for PPA 98

Two posts in one day is almost unheard of for me, but I wanted to post my card for the Pals Paper Arts challenge before the challenge ended. Also, I'm super honored and excited to share that last week I was chosen as a Pals Paper Artist Pick. :) You can view my card by clicking HERE. I am so inspired by the awesome creativity that is shared there every week, not only from their uber-talented DT but from everyone who plays along in the challenges. This week at PPA, they have a shared a great sketch:
I pulled out my NEW Just Add Cake DSP (coming out July 1st) and the Flower Fest set from the Summer Mini catalog for this one. There is just something about this paper that instantly makes me happy...which is odd because there isn't any PINK to be found in it, anywhere! I just love the mix of soft colors and the fun polka dots.  
I think I am one of the last people on the planet to discover the "cute-ness" of the Butterfly punch. I recently purchased it and can't seem to stop using it! :) I layered my butterflies for some dimension and heat embossed the little guys for added shine. I used Versamark ink and Clear Embossing Powder. You can see this better by clicking on the photo above. Their little "antenna's" were made with Silver Elastic cord. After adding the bling, I thought the "You're a Gem" sentiment seemed like a fun match. 
I used some scraps from the front of the card to decorate the inside, as usual. See how that sentiment is stamped on layered punches? That was NOT on purpose! It is covering up the VERY crooked sentiment I stamped the first time around. Oops! 


Thanks so much for stopping by! 
Have a very HAPPY day today! :) 


Stampin' Up! Supply List: 
Stamps: Flower Fest (Summer Mini Catty), You're a Gem and Sincere Salutations (inside)
Ink: Versamark and Wild Wasabi Classic ink
Paper: Just Add Cake DSP (New 2011-2012 catty), Wild Wasabi, Baja Breeze, So Saffron, Peach Parfait and Whisper White card stock 
Accessories: Butterfly punch, 1" Circle punch, 1 1/4" Circle punch, 1 3/8" Circle punch, Scallop Border punch , Decorative Label punch (inside), XL Oval punch (inside), Silver Elastic Cord (ret.), Basic Rhinestones, Perfect Polka Dots Embossing folder, Sticky Strip, Clear Embossing powder, Heat Tool, Embossing Buddy and Stampin' Dimensionals

Saturday, May 7, 2011

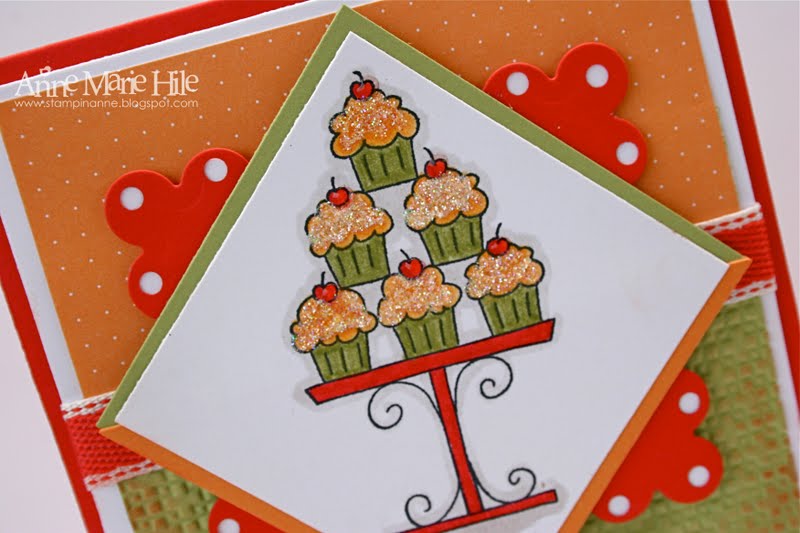
Peach, Poppy & Pear Cupcakes

Hello there! It is finally the weekend! Whoop whoop! (This post was scheduled for early this morning and Blogger didn't cooperate with me again...sigh!) I have to share that yesterday was also my sweet husband's birthday! No, this is NOT his birthday card...I don't think sparkly cupcakes are quite his "thing". :) I have a fun weekend planned for him though, shared with some GREAT friends. My card today was inspired by two challenges that I have not played with in a VERY long time. First up, I just LOVE the fabulous color combo from Pals Paper Arts this week: 

I combined those colors with this sketch from the Tuesday Morning Sketch Challenge:

I had it in my mind that I wanted to use the Crazy for Cupcakes stamp set for this card. I got the image stamped and colored then just couldn't figure out what to do with it. The circles on the bottom of the sketch really threw me for a loop. I attempted about 5 different border punches but nothing seemed to click.Then, I ran some Poppy Parade card stock through the Crimper (to mimic the bottoms of the cupcakes) and punched some circles. A few of them are popped up to add a little dimension. The cupcakes were decorated with some sparkle then topped off with dabs of Crystal Effects on the cherries. 
I also sponged some Poppy Parade ink on the Pear Pizzazz card stock and the banner sentiment. Finally, here is the inside of the card: 
Thanks for stopping by for a visit! Enjoy your day today! :) 

Stampin' Up Supply List: 
Stamps: Crazy for Cupcakes and Create a Cupcake (sentiment, ret.) 
ink: Basic Black and Poppy Parade Classic ink
Paper: In Color DSP paper pack (hostess, level 1), Poppy Parade, Pear Pizzazz, Peach Parfait and Whisper White card stock
Accessories: Dazzling Diamonds glitter, Crystal Effects, 1/2" Circle punch, Paper Crimper, Scallop Border punch, Poppy Parade Stampin' Write Marker, Pear Pizzazz Stampin' Write Marker, Peach Parfait Stampin' Write Marker, Poppy Parade 1/2" Stitched Poly Ribbon, Double Circle punch (ret.) and Stampin' Dimensionals

Friday, February 25, 2011

Create a *Sparkly* Cupcake

Howdy and Happy Friday to you! What a great week this has been, incredibly busy but great! I have been SO motivated to create ever since attending a demo meeting this week with a few of the fabulous gals from Hand Stamped Sentiments. I learned so many fun tips and techniques, it was AWESOME! Thanks again ladies! :) 

Today, I wanted to use my motivation to try some online challenges. First, I saw the color combo below from The Color Throwdown this week. The polka-dotted butterfly completely caught my eye. I am NOT the biggest fan of Tangerine Tango, but all the other colors in the mix are favorites. Then I read "Dunkin' Donuts" on the Color Throwdown blog and that was what stuck in my head...hence the cupcake. Ha, I actually JUST remembered that I have a donut stamp, too. (*WHY??*)
Then, I was inspired by this week's sketch from Tuesday Morning Sketch Challenges. I am LOVIN' that row of bling on the bottom of the sketch. Well, I guess it doesn't HAVE to be bling...but that's how my mind interprets it! I love bling! :)
Finally, Pals Paper Arts challenged participants to "use scallops in your own design this week.  Keep it clean and simple and let those scallops flow across your card!". There are even teeny, tiny scallops on the cupcake punch. That punch just makes me happy! 
Last night, I saw an awesome tutorial from Stampin! with Jaydee on using the Circle Scissor Plus tool, which was perfect because I didn't have circle punches in sizes that I needed for this card. My Circle Scissor and I have had a love/hate relationship since I bought it. For the past few months, it has actually been locked in the closet, as punishment, for frustrating me too many times to count. Jaydee really demonstrated some awesome tips to use that tool with flawless results! Hooray!! CLICK HERE for her video. Thanks again, Jaydee, for saving my Circle Scissor from an uncertain fate! ;)
Here is the decorated inside, using more scallops, a sassy sentiment and a little "mini-cupcake" punch (non-SU!) . All of the other products (and some details) I used to make the card are listed below, too.
Thanks for visiting today! Please leave me a comment to say "Hi!" before you go, if you would. Be sure to come back and visit again. I'm hoping to have some photos up soon of my craft room, as soon as I put the finishing touches on a few things. Have a very HAPPY rest of your day today! :)

SU! Supply List: 
Stamps: Create a Cupcake (Occasions Mini)
Ink: Pretty in Pink, Tangerine Tango Classic ink, Chocolate Chip Classic AND Craft ink (for embossed front sentiment)
Papers: Love DSP, Tangerine Tango, Pretty in Pink, So Saffron, Chocolate Chip and Whisper White card stock
Accessories: Circle Scissor Punch (for front circles), Scallop Border punch, 2 3/8" Scalloped Circle punch, 1" Circle punch, 1 1/4" Circle punch, 1 3/8" Circle punch, Build a Cupcake punch (Occasions Mini), Dazzling Diamonds Glitter, Paper Crimper, Stampin' Dimensionals and Basic Pearls
Non-SU! Accessories: pink gingham ribbon and mini-cupcake punch

Monday, November 22, 2010

Simple Snowflakes

Happy Monday! The countdown to Thanksgiving is on! I'm not sure where this year went, but I'm not ready for the holidays yet. How about you? I decided to whip up some more Christmas cards today, in my quest to make sure they actually go out on time this year. (Last year, I was mailing the last of the cards out on Dec 28th...not this year, no way!) The bright and fun color combo of Real Red, Old Olive and Tempting Turquoise came from this week's challenge at The Play Date Cafe. I've decided that I really CAN love red and green on a holiday card as long as another color is thrown into the mix. ;)
I was also inspired by the challenge at Pals Paper Arts, to incorporate fabric or ribbon on a CAS (clean and simple) card:
This polka dot ribbon (sadly, retired) is one of my favorites. It's just F-U-N! I really wanted to try something a little different with the ribbon and I really like how it came out, very simple. I also used the Vintage Wallpaper embossing folder to create some "fabric-like" texture in the background. The snowflake image is from the Patterned Pines set (ret.). 
That punched sentiment on the inside, is actually covering an "oopsie" where I originally stamped the sentiment crooked...and I mean REALLY crooked. Ugh! I was not about to redo the whole thing, so I decided to cover it up. Whew! Saved by the punches! 
If you have been following my posts on "Schnauzer-Gate 2010" (the little guy we found on our front porch on Nov. 8th), I have a small update. Unfortunately, we have still been unable to locate his owners. No one really seems to be looking for him. :( We did decide to give him a name though, because "the Schnauzer" or "Piglet", just didn't seem to be working anymore. My husband thinks he looks like a little football so, I threw out the first name of his favorite, retired Dallas Cowboys player and it just stuck. With that, may I present to you:
Emmitt Rowley von Bismark
Stampin' Up! Supply List: 
Stamps: Patterned Pines and Jolly Old Saint Nick (inside sentiment)
Ink: Real Red, Old Olive and Tempting Turquoise classic ink
Paper: Real Red, Old Olive, Tempting Turquoise and Whisper White card stock
Accessories: Vintage Wallpaper embossing folder, Real Red 3/4" Polka Dot Grosgrain ribbon (ret), jewels, Eyelet Trim border punch, Medium Oval punch and Scalloped Oval punch
Non-SU! Accessories: square button 

Thanks for stopping by! 
Enjoy your day! :)

Monday, November 1, 2010

Awesome Aviary

Happy Monday and Happy November! I am starting out the first day of the month with a cold! Ahh-Choo! Hello, Alka-Seltzer Cold and Flu...we have become great friends today. Such a bummer, as I even had to cancel dinner plans with a friend tonight. :(  Between sneezes and sniffles this morning, I had to whip up a card to get in the mail today. 

I used this sketch challenge from Pals Paper Arts:
Then mixed it up with this awesome color combo from The Color Dare (on time this week, phew!):
Color Dare #82
Daffodil Delight
Night of Navy
Old Olive

After making 30+ cards with the Aviary stamp set last month (for a swap), I was a wee bit burned-out on the cuteness of the set. I knew it wouldn't be long though before I wanted to bust out these little birds again. I think it's the chubby, little owl that makes me love this set so much. 
The Word Window punched sentiment (from the FYI set) landed there completely on accident. I originally decided to stamp the sentiment directly on the white card stock and wouldn't you know it, I stamped it crooked. Grrr, I hate it when that happens! I decided NOT to give into my OCD tendencies and re-stamp the whole bird image again. I just went with a different approach. I ended up really liking the look of the sentiment embossed in white, so I will just pretend I meant to do it all along. But since I already shared it, the secret is out...whoops! I blame the cold meds. ;)


For some final touches I rounded all of the corners to play off the round bird-cages (and that chunky owl, HaHa!) I added a fun flower and some sparkle to keep things bright and happy. Then I thought it would be cute to bust the bird friends out of their cages on the inside. Hope you like it! :) 
Stampin' Up! Supply List:
Stamps: Aviary, FYI (sentiment)
Paper: Daffodil Delight, Old Olive, Night of Navy, Whisper White card stock and Welcome Neighbor DSP (retired)
Ink: Daffodil Delight, Nght of Navy classic ink, Versa-mark (for sentiment)
Accessories: Scalloped Border punch, Word Window punch, 1" circle punch, Corner Rounder punch, Ribbon Originals "Mistletoe" (retired), Daffodil Delight 3/8" Taffeta ribbon (on the inside) and white embossing powder.


Non-SU! Accessories: paper flower and green jewels

Thanks for stopping by! 
Have an AWESOME day, 

Monday, October 25, 2010

Whimsical Birthday Treats

Happy Monday! Today I thought I would try something different and make not only a card project, but also try my hand at a 3-D gift project as well. It's "Two-Fer-(...eh)-Monday"! That would have sounded so much cooler if today was Tuesday, oh well. Okay, this is a post with a lot of photos but that makes it SO much easier then explaining it all. I used the inspiration from THREE challenges for this one...guess that makes it a challenge trifecta!

(*Edited to add: I am also submitting this one to the Hand Stamped Sentiments challenge for the week, "From a Card to Something Else". Thanks so much, Genny!) 


First up, it's the one year anniversary at The Play Date Cafe (woot-woot)!  To celebrate, the theme for this week was a pink, orange, yellow and white color combo along with the following photo for inspiration: 
For the sketch I went with the "square option" over at this week's Mojo Monday sketch challenge: 

Last, but not least, the Pals Paper Arts team threw out the challenge to incorporate some BLING onto your project this week. I think we ALL know how I feel about BLING...*sigh*...imagine my smiling face (instead of Marilyn's) in the photo below. Yup, sums it all up! 
So, what's in that little box anyway?? Have you seen **this super-fabulous tutorial** by Erica Cerwin (from her blog, Pink Buckaroo Designs)....as soon as I did, I was itching to whip one of these cute boxes up. Thank you, Erica for such an awesome project idea! :) 
How CUTE is this??? I always have some Anti-Bac Hand Gel in my purse to kill germs "on-the-go" and when I stopped by Bath & Body Works the other day, I saw their new "cupcake" inspired scents. YUM!  I scooped up a bunch of them with the intention of making these Birthday treats. The best part was, I put this box all together with left over scraps from my card. Ooooh, I just love it! 
As much as I thought about using a cupcake-theme on the card, I wanted to stay true to the photo-inspiration and incorporated some sparkly flowers. Ah, there's the BLING! My color combo was Melon Mambo, Pumpkin Pie, Whisper White and Barely Banana (ret.). Everything else is listed below in the supply list. Hope you enjoy this project and try out one of Erica's cute Anti-Bac boxes for yourself! :)
Stampin' Up! Supply List: 
Stamps: Whimsical Words (both front sentiments), retired Sale-A-Bration set, Birthday Bakery (cupcake tag in box), Hostess Level 1 and Happy Moments ("happy birthday" inside box), retired Sale-A-Bration
Ink: Pumpkin Pie classic ink
Paper: Melon Mambo, Pumpkin Pie, Whisper White and Barely Banana (ret.) card stock and Razzleberry Lemonade DSP (ret.) 
Accessories: Scalloped Border punch, 2 3/8' Scalloped Circle punch, Word Window punch, Boho Blossoms punch(inside card), Whisper White 5/8" Organza Ribbon, Perfect Polka Dots embossing folder, Melon Mambo, Barely Banana and Pumpkin Pie markers (cupcake tag)
Non-SU! Accessories: Jewels, flowers on front of card and box, border punch on box, circle die cuts


Thanks for stopping by! 
Enjoy your day, 

Tuesday, October 12, 2010

Bright and Sunny Birthday

Happy Tuesday! Well, it looks like it's going to be a hot and humid fall day in Texas today. Nothing like a 90 degree day in mid-October to put you in the mood for the fall season. HaHa! Since the temps feel so much like summer, I thought why not crank up the air conditioning and play around with some bright colors this morning.

I used this fun color combo from Pals Paper Arts (I will never miss any opportunity to use Melon Mambo, by the way. LOVE that color!): 
 I paired it up with this week's Mojo Monday Sketch:
I didn't intend on using this much Melon Mambo on the card (it is REALLY pink!) but it just kind of fell together that way. I decided to use the Playful Pieces (hostess, level 3) stamp set again because it was still sitting on my desk from the last card I made. It really am starting to like the versatility of this set. You can really do a lot with it for pretty much, any occasion. The sentiment is from the Wow Flowers set. I flipped the Top Note around from the sketch completely on accident...oops. It was already stuck down though, so I just left it alone. I also decided on the pink ribbon from my stash (looks like it could be a Melon Mambo impostor) because the loops tied in with the loops on the presents. Then I added some buttons, bling and glitter glue to dress it up a little more. 
Stampin' Up! Supply List:
Stamps: Playful Pieces, Wow Flowers (sentiment)
Ink: Pear Pizzazz, Peach Parfait and Melon Mambo classic inks
Paper: Pear Pizzazz, Peach Parfait, Melon Mambo and Whisper White card stock and Peach Parfait DSP In Color pad (level 1, hostess set)
Accessories: Top Note Sizzix Die, Scallop Trim Border punch and Perfect Ploka Dots embossing folder
Non SU! Accessories: pink bling, glitter glue, ribbon and buttons

Have a great day!