Sunday, December 4, 2022

Santa Express for PP620

Happy Sunday, friends!
Time for a fun new creative challenge over at The Paper Players
This week, LeAnne is hosting our Theme Challenge.
This Theme Challenge really had me put my thinking cap on at first. What could I use? I really didn’t want to dip into the retired “archives” and then I remembered a little hidden gem in my craft room. I sure hope you will get crafty and join us over at The Paper Players. We’d love to see what YOU create with this Theme Challenge!  

*I’ve listed all of the measurements and details for my card below and there is a full supply list at the very end of this post.
Color Combo: 
Look Ma, No Stamps: My card features the Santa Express Memories & More Card Pack from the July - December Stampin’ Up! ® Mini Catalog. This is currently on the Last Chance List at a 50% discount. Check it out HERE. All products on the Last Chance List are “while supplies last”, so get them while they are available! I love to use the Memories & More kits to create fun cards that look great but don’t take forever to create. We all love that “Easy Button” this time of year, right? 

I was kind of surprised at how quickly this card came together by die cutting the pre-printed Santa image and coloring one of the laser-cut wood words. In my search to find some Designer Series Paper that coordinated with my little Santa image, I came across the Painted Christmas DSP. I loved how this pattern added lots of festive color to the background without being too overwhelming. I popped in some embossed texture to the Basic White layer and glimmer paper to dress things up a bit. Of course, once I start with the sparkle, I can’t stop…so Santa got a dusting of Clear Wink of Stella Glitter Brush on his hat and beard. It's tough to see in the photos but adds a lot of sparkly detail in-person. 
Card Measurements & Details: 
  • Real Red Card Base: 5-1/2” x 8-1/2”, scored at 4-1/4”
  • Shaded Spruce Cardstock: 5-1/4” x 4” 
  • Painted Christmas Designer Series Paper: 5-1/8” x 3-7/8”
  • Basic White Cardstock: 5-1/8” x 2” emboss with pine pattern from Wintry Embossing Folders
  • Real Red & White Glimmer Paper (Real Red): 5-1/8” x 1/4” die cut with scalloped border from Penned Flowers Dies (save the scrap to use inside the card)
  • Santa Express Memories & More Card Pack: die cut Santa image with 2-5/8” circle from Layering Circles Dies and color the “ho ho ho” wood cut-out with a Dark Shaded Spruce Stampin’ Blends marker 
  • Add Clear Wink of Stella Glitter Brush to Santa’s hat trim, eyebrows, mustache and beard
  • Red Rhinestones Basic Jewels and Real Red/Garden Green Ribbon Combo Pack
  • Basic White Cardstock (card interior): 5-1/4” x 4”, stamp sentiment from the Framed & Festive stamp set in Shaded Spruce ink
  • Painted Christmas Designer Series Paper (card interior): 5-1/4” x 4”  
Finally, here is a peek inside the card! I stamped the sentiment from the Framed & Festive stamp set, which is while supplies last. It’s a great set for Christmas cards! I also added another strip of DSP and I used the scrap of Glimmer Paper left over from my scalloped border for a hint of sparkly detail. Use those leftovers from your die cutting, a little goes a long way with this sparkly paper! 

I hope you will join us this week over at The Paper Players and share your project for our ”Ho-Ho-Ho” Theme ChallengeWe’d love to see what you come up with! You can link up your project through Noon PST on Friday December 9th, 2022

Be sure to stop by and say hello to The Paper Players Design Team: 
 
Anne Marie Hile (that’s me!) 

Thanks for visiting today! All of the products that I used on this card are listed below. You c
an click on any of the photos to go directly to my 
Stampin’ Up!® online store. 

The current Host Code is: 
YMGAFEVE

Place an order over $50 (before tax and shipping) using the above host code, you will also receive a gift from me: a FREE Exclusive Project Tutorial PDFsee the sneak peek below. Each month, I partner with an amazingly talented group of demonstrators from around the world to create these project tutorials. This month's tutorial features 12 awesome project ideas to inspire your creativity! 
If your order is over $150, please do NOT use the host code. 
You will still receive the PDF tutorial along with an additional free gift from me.


Thanks for stopping by.
Have a HAPPY day!

BIG hugs, 
Anne Marie

Product List

Thursday, December 1, 2022

Positive Inkers Blog Hop - December 2022

Hello Stamping Friends! I’m thrilled to join the Positive Inkers Design Team for our December Blog Hop. We are a group of Stampin’ Up!® Demonstrators from around the globe who are super-excited to share our love of creativity. I’m so happy you stopped by today! 

If this is the fist time you are visiting, please let me introduce myself. My name is Anne Marie Hile and I live in San Antonio, Texas. Welcome!
Our theme for this month is: A Sketch Challenge!

It’s no secret that Sketch Challenges are my FAVORITE! Sketches are such a great starting point for creative inspiration. Once I see the sketch, I head over to my stamps and look over every single set to find the one set that “speaks” to me for the layout. Then I pick my colors, embellishments, etc. I hope this sketch inspires you to create as well! 

*I’ve listed all of the measurements and details for my projects below and there is a full supply list at the very end of this post.

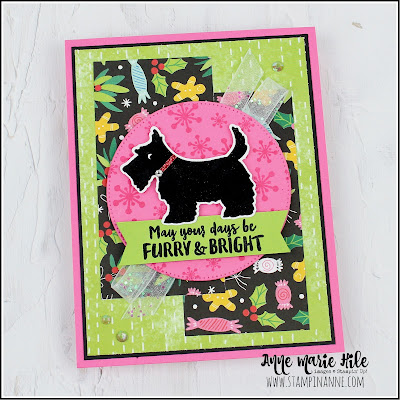
Sandy put together this awesome sketch for the blog hop and I LOVE it! You can add lots of patterns and layers OR just keep it simple too. So many possibilities! When I saw the sketch I immediately got the idea in my head that it would be fun to use with lots of Designer Series Paper. I love DSP but tend to be stingy with it on my cards. But, pretty paper can’t be seen if it’s stuck on your shelf, right? 

One of my favorite packs of DSP right now is the Celebrate Everything Host DSP from the Stampin’ Up!® July - December Mini Catalog. This giant pack of paper can be earned to purchase with a $150 or more order. The colors and patterns are so cheery and fun, it’s totally a must-have in my opinion. But if you love it, get it NOW. It’s on the Last Chance List and will only be available through 1/4/23 OR while supplies last. 
Color Combo: 
Which brings me to another one of my favorite products in the Mini Catalog, the Christmas Scotties stamp set. As a dog lover, this was one of the first sets I purchased in this catalog and it has seen a LOT of ink. Sadly, it will be retiring so if you don’t have it yet, it’s a great time to snag one of your own. The stamp set coordinates with the Scottie Dog Punch (which is 30% off right now, while supplies last) which is also adorable. 

For my card, I went with a bright, non-traditional holiday color combo, which if you have visited me before is my jam. Don’t get me wrong, I do love traditional holiday colors but if I have the opportunity to use pink on a card, I’m totally doing it! There’s a lot of pattern on this card, but I think it works. The scottie dog and sentiment are also heat embossed which really add some gorgeous shine in-person. Of course, I had to add lots of sparkly detail for the finishing touch. I love how it came out and I hope you do as well. :) 
Card Measurements & Details:
  • Polished Pink Card Base: 4-1/4” x 11”, scored at 5-1/2"
  • Basic Black Cardstock: 4” x 5-1/4” 
  • Celebrate Everything Host Designer Series Paper: 3-7/8” x 5-1/8” 
  • Celebrate Everything Host Designer Series Paper: 2” x 4” - 2 pieces
  • Polished Pink Cardstock: scrap to die cut largest circle from Stylish Shapes Dies, stamp snowflakes in Polished Pink ink
  • Granny Apple Green Cardstock: 3” x (just under) 3/4”, stamp sentiment in Versamark ink, heat emboss with black embossing powder and punch both ends with Banners Pick A Punch
  • Basic White Cardstock: scrap to stamp scottie dog in Versamark ink, heat emboss with black embossing powder and cut out with Scottie Dog Punch
  • Real Red Glimmer Paper: cut scraps for the dog collars (front of card and card interior)
  • Basic White Cardstock (card interior): 4” x 5-1/4”, stamp scottie dog and sentiment in Momento ink
  • Celebrate Everything Host Designer Series Paper (card interior): 3-7/8” x 5-1/8”
Finally, a peek inside the card. I added another piece of that adorable DSP along with a stamped image and sentiment. Of course, I HAD to add another glittery collar to this little pup because you can never have too much sparkle, right?  

I hope you enjoyed my projects today and that you are inspired to create with this fun card sketch! Please stop by to visit everyone on the hop and leave us a comment to say hello. We’d all love to hear from you and so appreciate you stopping by. If you are following the hop, my sweet friend Jo Blackman in the UK is your next destination. 

We are also doing an Instagram hop today and I’d love to have you check it out. If you aren’t already following me on Instagram, you can find me HERE

Positive Inkers Global Design Team - December 2022:
Thanks for visiting today! All of the products that I used on this card are listed below. You c
an click on any of the photos to go directly to my 
Stampin’ Up!® online store. 

The current Host Code is: 
YMGAFEVE

Place an order over $50 (before tax and shipping) using the above host code, you will also receive a gift from me: a FREE Exclusive Project Tutorial PDFsee the sneak peek below. Each month, I partner with an amazingly talented group of demonstrators from around the world to create these project tutorials. This month's tutorial features 12 awesome project ideas to inspire your creativity! 
If your order is over $150, please do NOT use the host code. 
You will still receive the PDF tutorial along with an additional free gift from me.


Thanks for stopping by.
Have a HAPPY day!

BIG hugs, 
Anne Marie

Product List